Pop Top – Part 1 – frames
So you want to build a pop top for your Defender 110?! Either because you just enjoy doing it yourself, or like us, because you simply can’t afford a €5000-€15000 add-on for your Defender. Whatever the reason, with our How-to you will be able to build yourself a complete pop-top for under €2000,-
The complete DIY guide for this pop top will consist of 3 how-to’s. The first one will tackle the hinging frame, the second the tent fabric and the third one the bed. At the moment of writing, only the first how-to is finished. But by the time you have finished this the other parts should be published too.
Building a pop-top for your Defender will be an extensive project. But not to worry – Anybody with the will and at least one right hand and a set of basic tools will be able to build this Pop-top. Aluminium welding will be necessary and no, we couldn’t do that ourselves either. We paid a metalworker to weld everything together and asked for help wherever needed.
This first how-to consist of a 3D blueprint, a written step by step guide, a basic tools list and a material list. All are available for free. Please be aware that we did our outmost best to avoid any mistakes in our how-to. Nonetheless it could be that we made mistakes. All responsibility lies with the user of this how-to. If you end up building the pop top and find a mistake, please do let us know, so that we can make the necessary adjustments.
Before we start, some considerations:
- Anything you measure, measure it at least twice.
- Before disassembling the roof first measure all dimensions as explained in Part 1.
- Before disassembling the roof use a waterproof marker to draw lines on the bottom of your roof’s rain gutter all around your Defender. When you are at the stage of installing the blind rivet nuts, these guiding lines will help you place the upper frame correctly on your roof.
- We re-used the mounting bracket on the top of the B-pillar. The part where this bracket was mounted will be wider on the pop top , so we bent the bracket horizontal for test-fittings. After the frame is done we test fitted the frame, bend the bracket back in its new position, marked the 2 holes on the frame and placed M6 blind rivet nuts here.
- After you measured your Defender in part 1 we would advise to remove the roof. It will make things easier, if you have a space to park your Defender that is inside or under a carport during this process and for the time it will take you to make this pop top. Get the roof lining out of your roof. If you feel like redoing the lining, now would be a good time.
- Always use cutting fluid/grease when drilling/sanding/grinding in aluminum.
Defender Pop Top written How-to
This download supplies you the written how-to of Gaia’s Trek DIY Pop Top
Defender Pop Top Blueprint
This download supplies you with the 4 page blueprint of Gaia’s Trek DIY Pop Top.
Part 1 – Measuring your Defender
The first step of building your own pop top is measuring your Defender. We have supplied you with a blueprint which states all the measurements and everything should fit, but for the sake of thoroughness, measure your own Defender, it will only take around 10 minutes. Measure your Defender with the roof still attached to the body as the body panels tend to move a bit when the roof is no longer bolted in place.
Start as follow.
- Measure the width of your Defender at the rear. Measure right under your roof’s rain gutter, from left to right. The width should be 1435mm.
- Measure the length as shown in picture 2. The length should be 2828mm.
- Measure the width of the rear doorpost as shown in picture 3. The width should be 868mm.
In case you find big differences between the dimensions of your Defender in relation to the blueprint, change the measurements of the drawing accordingly. Be aware though that depending on which dimensions you change, these changes could impact other dimensions. When the differences are minor (± 1-3mm), we believe that you can still easily use the blueprint. A Defender stays a Defender after all.


Part 2 – Making the upper frame
Now we have the initial measuring done, it is time to start building! Let’s begin with something fairly easy, the upper frame.
Quick rundown
The upper frame will be attached to the roof of the Defender and consists of 4 tubular profiles of 30x50mm welded in miter. The frame will house the gas struts when the roof is closed, slits need to be made for these. On both sides of the gas strut slits, and on the rear corners, rubber stoppers will be fitted. These stoppers will support the upper frame on the bottom frame when closed. On 6 spots there will be ø20mm holes that hold the ø10mm safety pins from the bottom frame when closed. On both ends of the frame, a 3mm thick aluminum plate will be riveted. These plates will blank off the gaps left by the no longer existing rear door and windshield frame. The frame will be attached to the roof with all the original mounting holes. For the original mounting holes, countersunk blind rivet nuts will be used in the frame except for where the gas struts will be. Here we will use M6 bolts with rings and nuts. When unbolting the roof from the body, at the spot of the alpine windows you will find a bracket (both sides) we recommend re-using these for added strength. On the blueprint page 4, you will find the overview of the upper frame.
Steps
- Cut 2x 30mmx50mm aluminum tube to a length of 2783mm in miter.
- Cut 2x 30mmx50mm aluminum tube to a length of 1435mm in miter.
- Weld the tubes together with 50mm being the width and 30mm the height.
- Grind/sand welds on top, bottom, and outside corners so they look and feel smooth. The inside of the corners doesn’t matter but could be grinded for a nicer finish.
- Check if the frame is square by measuring opposite corners. If both measurements give the same dimensions your top frame is square. If they differ, adjust. You can do this by picking up the frame and dropping it gently on one corner on the floor. re-measure and correct again if needed. For every meter of length, you may be 1mm off.
- Now mark the front, back, bottom, and top with a marker.
- Cut the slits for the gas struts. The slits will be 595mm long and run from 880mm to 1475mm measured from the outside of the rear of the frame. The width of the slits will be 30mm and placed centered. Use painter’s tape and draw on it. After you have drawn, cut the slits. We used a 30mm drill on both ends to create a nice round edge and cut the lengths with an angle grinder. Do this step for both sides.
- Determine where you rubber stoppers come. Our stoppers measure ø25mm with a thikness of 10mm. The foot of the stoppers has an M6 thread which makes them adjustable. We placed the center of the stoppers 30mm out on both sides of the gas-strut slits, and 1 in each of the rear corners. 6 stoppers in total. See blueprint page 4.
- Drill the 9mm holes for the stoppers and place M6 rivet nuts. Use a sealant underneath so the connection between blind rivet nuts and frame is watertight.
The first part of constructing the upper frame is finished. Rivet nuts, gas strut, hinge, safety-pin holes, and rubbers will come at a later stage.
Part 3 – Making the bottom Frame
The bottom frame is again a straightforward part. It will only be slightly more difficult than the top part as it has more components and different tube sizes.
Quick rundown
The bottom frame will be attached to the body of your Defender and consists of multiple rectangular aluminum tubes of different sizes and a bend aluminum sheet that creates the front windshield cover. A piece of aluminum sheet is also needed to close the cut-out of the safari door crossbar/bridge. The bottom frame will be bolted to your Defender using the body’s original bolt holes. The bottom frame will be fitted with countersunk head blind rivet nuts size M6. The bottom part of the bottom frame will need aluminum angles/L-profiles to hold the door rubbers. Depending on your Defender model, you need 2 or 4 pieces. The rear door rubber bracket (MTC4290) which is originally riveted in the roof will be reused. On the top surface of the frame, 6x ø13mm SS safety pins will be installed. The pins need M10 countersunk head blind rivet nuts. The gas strut feet will be mounted on the top surface as well using M6 blind rivets. To hold the fabric in place, and to make a bed support you will need 2 L-profiles on both sides. In Part 5 the hinge to connect the 2 frames will be installed.
Steps (see pages 2 and 3 of the blueprint)
- Cut 2x 120x50mm aluminum tubes to a length of 2828mm, these will be the side beams see item A-A page 3.
- Now you need to make a couple of cut-outs to create what is shown in item N page 2. Use the dimensions shown in item E page 3. You need to do this on both side beams, mirrored. We used a scratch pen to draw in the aluminum and an angle grinder/metal saw to make the cut-outs.
- Cut the rear end of the tubes in miter see item D page 3. Pay attention that you cut it towards the correct side. After this, the side tubes are done.
- Now the rear crossbar/bridge. Cut 1x 120x50mm to a length of 1435mm with both ends in miter. See items D and J-J page 3.
- Make the safari door cut out (873mm with a ratio of 90) as shown on blueprint page 3 item J-J. We used the door rubber L-profile (MTC4290) as a template. When using MTC4290, be aware that you need to make the cutout 3mm thicker as you need to weld in 3mm of sheet aluminum to close the back arc (see step 7).
- For extra strength in the door arc, we added 2x aluminum angles of ±1100x20x20mm (3mm thick) on the inside of the top surface corners. We highly recommend you make a strengthening of some sort here to avoid the arc of breaking when too much weight is put on. Weld these angles in.
- Now you need an aluminum sheet of 50mm wide and at least 971mm in length. This will be the closure of the back-arc. We took a longer piece of sheet aluminum and started on one corner with spot welds, and continued till we made it to the opposite corner of the arc. Here we cut off the excess and welded everything together.
- Cut the 80x40mm crossbar to a length of 1429mm see items H-H & E page 3 and item B page 2.
- Cut the 30x15mm tube to a length of 1429mm see items H-H & E page 3 and item B page 2.
- The above tubes form the front crossbars of the bottom pop-top frame.
- Now it’s time to weld everything together. We started with welding the rear crossbar to the side beams.
- Weld in the 80x40mm crossbar and on top the 30x15mm crossbar at the front. You will not be able to weld every seam due to accessibility, but just weld everything that can be reached.
- Before making the front window cover, we would advise test fitting the bottom frame on your Defender. Align the frame, and check if everything lines up, especially in length. When the rear part is afloat with the Defender, make sure that the angled front part just aligns/slightly sticks further than your windshield frame as the front flap has to fall over this frame. Be aware that without your roof mounted, your window frame can have the tendency to tilt inward. Measuring the distance from the rear of your Defender to the windshield frame will tell you if this is the case.
- Now make the front window cover. See items H-H bottom drawing and E on page 3. The front window cover needs a 115-degree bend, preferably done by a metal brake. If you don’t have a brake ask a local metal worker. Before bending, I would recommend making the window cutout first see H-H on page 3, 2nd image. You only need a jigsaw and an angle grinder.
- After the front cover is done, weld it on the frame. Make sure the welds aren’t too thick on the top as the hinge needs to fit. In case a weld sticks out too much, grind it down till the hinge fits. Grind down any welds on the sides to give your frame a nice finish.
Part 4 – Blind rivet nuts for top and bottom frame + safety pins + fabric/bed mounts.
Quick rundown
Both pop top frames will be bolted using the existing bolt holes of your Defender. In both frames you need to install M6 countersunk blind rivets. Ideally you use aluminum rivet nuts in the aluminum frame. Our experience though, learned us that the aluminum blind rivets nuts are weak and thus a pain to work with. We used galvanized steel blind rivet nuts instead. We are not worried for rust as the majority of these blind rivet nuts are inside the vehicle. For the 6 safety pins on the top surface of the bottom frame we used stainless steel M10 countersunk blind rivet nuts. In these we placed pieces of M10 threaded rod over which the hollow safety pins are screwed. Use a sealant underneath and in all blind rivet nuts on the outside of your tent fabric to make them waterproof.
In part 2 you already installed the rivet nuts for the rubber stoppers. You only need to screw them in.
Bottom frame
- We’ll start with the bottom frame. Place the bottom frame on the body of you Defender.
- Align the frame starting at the rear. In our case the L cornered body panels where we have our sliding windows had the tendency to lean out a bit when the roof was no longer attached. Be aware of this possibility and in case needed, push them inward while a 2nd person is copying the holes onto the frame with a marker (see step 6).
- You can use clamps on the body and frame to hold it in place.
- Between the top of the windshield frame and the bottom of the pop top will be space. Fill this up with spacers. We used 1-2mm thick pieces of 50x20x1mm aluminum and stacked these till we were happy. If needed, combine different thicknesses to get the best result.
- We recommend using 6 staples with a hole or U-shape in the middle placed at each bolt hole of your windshield frame. Like so, the downward force from the bolts will rest onto these stacks.
- when you are happy with the positioning of your bottom pop top frame, mark all the bolt holes, drill them out and place the countersunk blind rivet nuts. Don’t forget the vertical bolt holes at the B-pillar.
- Now is also a good time to drill the holes and instal the blind rivets for the safety pins and gas struts.
- We placed the safety pins with their centers on 100mm, 800mm and 1560mm measured from the outside of the rear-end of the frame see A-A page 3 2nd image. Place M10 countersunk blind rivet nuts here. It could be handy to mark the centers of your blind rivet nuts on the outside of your frame with a piece of paper tape and pencil. By doing this you can place your upper frame on top of the bottom frame and mark where the holes in your top frame need to come.
- Now it’s time to the install the blind rivet nuts for your gas-strut feet. We used an a-symmetrical foot, see pictures. The center of our foot is placed on 1430mm measured from the outside rear of the frame, and in the center of the 50mm width of the tube.
Upper frame
- Put the roof upside down.
- Remove the L-profiles that supported the door rubbers. Ours had some rivets which need to be drilled out. After this use a chisel/hammer and some force to remove the L-profiles. They probably bend while removing but you don’t need them afterwards.
- Place the top frame upside down on the roof, gas strut slits facing upward and obviously front to the front.
- Now your markings on the bottom of your rain-gutter come in handy. Align the frame within your markings, when satisfied, clamp the roof and frame together.
- Now mark all the bolt holes from your roof on to your frame. Mark the holes that correspond with the bracket that was fitted around your alpine windows. These holes need to be drilled (6mm) but not fitted with blind rivet nuts. You will use bolts here.
- Remove the frame and drill all the holes, add blind nut rivets (except where the bracket is).
- Now bolt your frame with a just couple of bolts to your roof so it sits in the correct place.
- Time to drill the 6mm holes for your gas-strut brackets. We again used A-symmetrical feet (same as bottom frame). Place the feet as far as possible to the rear end of the slit, but make sure you can access the bolt holes(see pictures). When installing we used Allen bolts as you need less space around the bolt compared to a hexagon bolt.
- Drill the hole through your frame and through the roof. You want to watch out here as you will rapidly hit the curve of your roof as soon as your are through and you don’’t want a leaking roof.
- Don’t install the gas-strut feet yet. You will want to wait with this till you actually place the gas-strut as there is very little space in the slit and you would need to mount the feet with the gas-struts attached already. More on this in part 11.
The top frame is now finished. As everything is still test assembled we would recommend to keep everything as it is (semi-mounted) and continue to part 5, closing the gaps.
Part 5 – Closing the gaps – blueprint page 4
Quick rundown
With the top frame installed on your roof you will notice 2 gaps on both the front and rear end of your roof. Your windshield frame and rear door where once here. We used 3mm thick sheet aluminum to fill up these gaps. We attached the front sheet with blind rivets to the front of the frame. Use a sealant in between. For the rear one we made makeshift brackets to which we riveted the closure. You can also buy another MTC4290.
- See item L and I on page 4 for details.
- Pay special attention to item I – space for hinge.
- In the roof you will find a rubber on the windshield side. This rubber can be discarded.
- We first made models out of carton, and worked from there.
- After you made the closure sheets, drill all the holes for rivets and create some brackets for the rear.
You want to wait with riveting anything till you painted (in case you paint).
Part 6 -The hinge + safety pin holes
Quick rundown
Installing the hinge will be straight forward. You have an upper and bottom part and they slide into each other. We made the bottom hinge section the exact width of the frame. The top section we made around 3mm shorter. In the ‘snail house’ of the bottom hinge section is a hole. We tapped M6 thread in there. After you installed the entire pop top on your Defender, use an oversized plain washer and M6 bolt on both sides. This avoids the top hinge to move from left to right but because of the 3mm still has freedom of movement.
- Place the bottom hinge section on your bottom frame. Drill holes every 50mm or so, starting around 20mm from the edge. We used Ø4mm blind rivets so we drilled 4,1mm holes. You need slightly longer blind rivets here as the total thickness is: hinge 3mm + front flap 3mm + aluminum crossbar 3mm. Keep this in mind.
- Place the top hinge on your top frame and do the same as above. Here you can use shorter blind rivets (3+3=thickness).
Use a sealant between the hinges and frames, clean up after riveting. We waited with riveting the hinges on till after painting. If you would like to test your whole pop top before painting, you can rivet your hinges on and remove them later. Don’t forget to be thorough with removing the rivet leftovers after drilling them out (they will clatter around while driving if you don’t).
Now for the safety pin holes in the upper frame:
- Place upper frame on bottom frame and align.
- Copy safety pin markings from bottom frame to upper frame (remember Part 4 step 8?).
- Drill the Ø20mm safety pin holes in the bottom of your upper frame.
Part 8 – Installing bottom frame on car
After everything is painted you can install the frame. We used SS M6x25mm hexagon bolts with a spring washer underneath. We kept the original seals in place except at the windshield. Before you place the frame on your Defender it’s time to use sealant. We used Sikaflex 252 but any PU adhesive will suffice. Put nice thick beads on the top of all your body panels. For the L panels at the rear of our Defender we put sealant both on the original rubbers as next to it. Don’t be scarce on top of the windshield frame. It will get messy but you can clean everything up afterwards. Don’t forget to have the aluminum spacer stacks in place. The B-pillar has it’s own original EPDM foam and no sealant was needed.
Now place the frame on your car and start putting the bolts in. We started with the rear corners and continued from there. Do not tighten any bolt until all are in. Now bolt everything up. Tight is tight, don’t overdo it or you might spin your blind rivet nuts. After everything is bolted start cleaning up the excess sealant. At last you want to put a bead of sealant at the front window cover flap. Clean up, check if you are satisfied and continue to the top frame.
Part 9 – Installing top frame on roof
Before we start sealing and bolting the top frame to the roof we want to install the front cover to the frame.
- Put sealant between the frame and front cover and rivet them together.
- Now put a good bead of sealant on the bottom of the rain gutter/roof or on your upper pop top frame (be aware of the safari door gap and windshield gap).
- Place the frame on your roof and bolt it up. We used SS M6x25 hexagon bolts with a spring washer wherever a blind rivet nut was used.
- Around the alpine window we used the same bolts but with a nylon nut on the inside of the roof as we reused the original brackets there.
- Again first put all bolts in loosely till you are happy with the placement of the frame, then tighten.
- The rear closure sheet you can install as last. Make sure to seal all the seams after installation.
Part 10 – Rubbers
On all sides of the upper pop top frame except off the front we used 2 strokes of rubbers mounted on the outer and inner side of the bottom surface. The middle will be left empty. This is first of all so that the gas-struts are not obstructed plus there is the theory that an air pocket between 2 rubbers promotes water tightness. We used EPDM closed cell foam of 15mm high by 10mm wide. We simply glued this on the frame with ordinary second glue. If you can get self sticking EPDM even better.
Make sure you start the foam literally against the joint/snail house of the hinge. This prevents water blowing in behind the hinge. Just behind the hinge we only added one strip EPDM from left to right as the sole of the hinge is in the way. Where you have corners, glue them together preferably with sikaflex (stays more flexible compared to second glue).
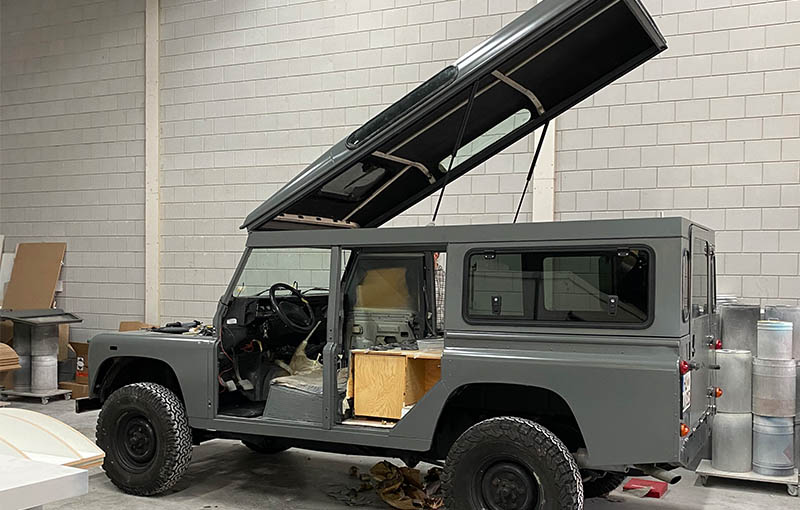
Part 11 – Merging the frames and installing the gas-struts
It’s time for the last part of the pop top frame! You would preferably have a team of 4 people to carry and place the roof.
- Make sure you have all your small bits and bolts at hand or else it can get stressy! A long wooden beam to support the roof before the gas-struts are installed would come in handy as well.
- Pick up up the roof and slowly slide it into the hinge. Don’t use force! It might take a bit of wiggling.
- When the roof is in place lower it down and check if everything aligns, if not, rectify.
- Bolt in the M6 bolts on both sides of your hinge. Don’t forget the plain washers.
- Lift the roof far enough up that the gas-struts fit in between. Support the roof with some sort of beam as mounting the gas-struts may take a moment.
- We first fitted the gas-struts with their feet attached to the top frame. To be able to access both bolt holes the gas-strut needs to move freely.
- After both upper feet are mounted simply place the bottom of the gas-struts into the feet that are already on the bottom frame.
- Now try to close your pop top!
Last bits and bobs
You are as good as done with the frame part. Now fix the last bits and bobs.
- Depending on how many passenger doors you have, get some aluminum L-profiles of 15x15x2mm to create the new door rubber holders. We used blind rivet nuts, but you can also use normal rivets. Use sealant when placing the L-profiles. We used butyl tape wherever the rubber L-profiles don’t close.
- Rivet back the safari door rubber holder.
- Place back all door rubbers.
- Add 2 closing clasps at the rear. Any would suffice we like ours to be adjustable and lockable (see pictures).